FlutterはGoogleが提供するものでクロスプラットフォーム開発が可能です。Android以外にもiOSアプリやWebアプリ開発もできます。
Flutter
ここではFlutterの Android/iOS 開発環境をMacで設定していきます
1. Flutter SDK
1.1 Rosetta インストール
1.2 Flutter ƒダウンロード
1.3 環境変数PATHの設定: Flutter SDK
2. Android Studio
2.1 Android Studio インストール
2.2 flutter Plugins インストール
3. VSCode インストール
4. XCode インストール
5. Flutter doctor
6. テストプロジェクト
Flutter SDK
Flutter SDKを以下よりOSに合わせてダウンロードします。(ここではMac OSとして進めていきます)
Install Flutter
![[Flutter] Mac でのAndroid & iOS 開発環境設定 1x1.trans - [Flutter] Mac でのAndroid & iOS 開発環境設定](https://akira-watson.com/wp-content/themes/simplicity2/images/1x1.trans.gif)
mac OSを選択
アプリのタイプはRecommendedはiOSですが、これは別の記事でやりますので
Androidを選択
![[Flutter] Mac でのAndroid & iOS 開発環境設定 1x1.trans - [Flutter] Mac でのAndroid & iOS 開発環境設定](https://akira-watson.com/wp-content/themes/simplicity2/images/1x1.trans.gif)
Screenshot
Macのケース:開発環境に必要とされる条件
- CPU cores: 最小で4個、8個が推奨
- RAM: 最小で8GB、16GBが推奨
- DisPlay: 最小で1366 x 768、1920x1080が推奨
- Disk Space: 最小で44GB、70GBが推奨
- macOS: 10.15 (Catalina) 以降
Rozetta インストール
M1チップ以降のMacでは、いくつかのSDKに含まれる実行ファイルがx64アーキテクチャで提供されているために Rosetta 2 をインストールする必要があります
アプリケーションのユーティリティにあるターミナルを起動して以下のコマンドを打ちます
PasswirdはMacのパスワード
|
1 2 3 4 5 6 |
sudo softwareupdate --install-rosetta --agree-to-license Password: By using the agreetolicense option, you are agreeing that you have run this tool with the license only option and have read and agreed to the terms. If you do not agree, press CTRL-C and cancel this process immediately. 2024-08-02 09:19:12.004 softwareupdate[1955:38920] Package Authoring Error: 062-01890: Package reference com.apple.pkg.RosettaUpdateAuto is missing installKBytes attribute Install of Rosetta 2 finished successfully |
Flutter ダウンロード
Start building Flutter Android apps on macOS
に沿って進めていきます。
MacのCoreが古いIntelChip か M1Chip以降かによります
Intel ChipではiOS(Androidではなく)の最新のXcodeが使えないので実質iOS用としては無理がありM1以降が現実的です(Androidの開発では使えます)
VS Codeでのセットアップでも可能ですが、Android Studioを使う場合はこちらを選択
flutter_macos_xxx.zip のzipファイルをダウンロード
![[Flutter] Mac でのAndroid & iOS 開発環境設定 1x1.trans - [Flutter] Mac でのAndroid & iOS 開発環境設定](https://akira-watson.com/wp-content/themes/simplicity2/images/1x1.trans.gif)
Screenshot
過去の古いSDKはこちら Flutter SDK releases にあります。
flutter_macos_xxx.zip のzipファイルを解凍し、開発用のフォルダに展開します
例えば ~/development/
環境変数PATHの設定: Flutter SDK
このflutter sdkにPATHを通してどこからでも実行させられるように環境変数のPATHに追加します。
ますMacのSHELLの確認をします
ターミナルで
|
1 2 |
$ echo $SHELL /bin/zsh |
これは SHELL が zshだとわかります
古いMacではbashもありますが、最新ではzshです
.zshrc あるいは .zprofile があるかないか確認します
ターミナルを開きます
|
1 2 3 4 5 6 7 8 9 10 |
//場所はPWDでわかります $ PWD /Users/[ユーザー名] // ファイルの確認 $ ls -la ... .zprofile ... .zshrc |
|
1 |
$ touch ~/ .zshrc |
この .zshrc にPATHを設定するため開きます
|
1 |
$ open .zshr |
|
1 |
export PATH=$PATH:[flutterがあるPATH]/flutter/bin |
|
1 |
$ source .zshrc |
flutterの確認
|
1 2 3 4 5 |
// flutter のPATHが表示される $ which flutter // Welcomeなどコメントが現れる $ flutter --version |
Android Studio
Android Studioを設定します。これを使うとAndroidのエミュレータが使用できます。またDartのエディタとしても使えます
Android Studio インストール
Android Studio をWindowsにインストールするには以下を参考にしてください。
エミュレータ:
Android Studioがインストールできたなら、以下を参考にエミュレータを設定します。
コマンドラインツールをインストール:
Android Studio のSDKmanager を開き
「SDK Tools」のタブから
コマンドラインツールをインストールします
Android Licensesの許可:
以下コマンドを入力して規約に了承する意味の y を入力
|
1 2 3 4 5 6 |
C:\Users\hoge>flutter doctor --android-licenses ... Accept? (y/N): y ... Accept? (y/N): y ... |
flutter Plugins インストール
Android Studio を起動します
「Plugins」タグから、「flutter」を検索してインストール
![[Flutter] Mac でのAndroid & iOS 開発環境設定 1x1.trans - [Flutter] Mac でのAndroid & iOS 開発環境設定](https://akira-watson.com/wp-content/themes/simplicity2/images/1x1.trans.gif)
インストールが終わると「Restart IDE」と表示されるのでクリックしてAndroid Studioを再起動させます
VSCode インストール
Flutterのエディターとして推奨されているのが VSCode (Visual Studio Code) です
Android Studio でもできないことはないのですがこちらの方が軽いです
まずはダウンロードです。
Visual Studio Code Mac版をダウンロードします。
![[Flutter] Mac でのAndroid & iOS 開発環境設定 1x1.trans - [Flutter] Mac でのAndroid & iOS 開発環境設定](https://akira-watson.com/wp-content/themes/simplicity2/images/1x1.trans.gif)
VSCode-darwin-universal.zip ファイルがダウンロードされます
解凍すると実行ファイルになるので、適宜別の場所に保存して起動
![[Flutter] Mac でのAndroid & iOS 開発環境設定 1x1.trans - [Flutter] Mac でのAndroid & iOS 開発環境設定](https://akira-watson.com/wp-content/themes/simplicity2/images/1x1.trans.gif)
プラグインをインストール
左のアイコン 拡張機能(Extensions) をクリック
「検索窓」に fultter を入力すると
いくつか候補が出くるので、まずはFlutterをインストールします
![[Flutter] Mac でのAndroid & iOS 開発環境設定 1x1.trans - [Flutter] Mac でのAndroid & iOS 開発環境設定](https://akira-watson.com/wp-content/themes/simplicity2/images/1x1.trans.gif)
Xcode インストール
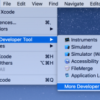
Mac App Store からダウンロードすると、アプリケーションにXcodeが入っていると思います
Xcodeを起動すると
macOS は既に入っていますが、追加でiOSにチェックを入れてインストールします
![[Flutter] Mac でのAndroid & iOS 開発環境設定 1x1.trans - [Flutter] Mac でのAndroid & iOS 開発環境設定](https://akira-watson.com/wp-content/themes/simplicity2/images/1x1.trans.gif)
その後、再度Xcodeを起動すると、Simulatorがインストールが始まってそれなりに時間がかかります
![[Flutter] Mac でのAndroid & iOS 開発環境設定 1x1.trans - [Flutter] Mac でのAndroid & iOS 開発環境設定](https://akira-watson.com/wp-content/themes/simplicity2/images/1x1.trans.gif)
Xcodeがインストールできました
full instration のため以下のコマンドを打ちます
|
1 |
$ sudo xcode-select --switch /Applications/Xcode.app/Contents/Developer |
|
1 |
$ sudo xcodebuild -runFirstLaunch |
最後にiOSプラグイン管理のCocoaPodsをインストールしておきましょう
|
1 |
$ sudo gem install cocoapods |
あるいは、
|
1 |
brew install cocoapods |
CocoaPodsのインストールはMacによって色々あるようで一筋縄では行かなかったのですが
flutter doctor でエラーになったら、サジェスチョンが出ているのでそれを見て試行錯誤してみるということでしょうか
問題点として、macOS標準のRubyのバージョン問題でCocoaPodsがインストールできない
ということが分かっています
実はこれはiOS開発では昔からのことで、以下が参考になるかもしれません
とりあえず、主要なツールは入れて設定しました
Flutter doctor
flutter doctorを使って環境がセットアップされているか確認します。
ターミナルを起動して以下コマンドを入力します
最初はversionを確認してみます
|
1 2 3 4 5 6 7 |
$ flutter --version Flutter 3.22.3 • channel stable • https://github.com/flutter/flutter.git Framework • revision b0850beeb2 (2 weeks ago) • 2024-07-16 21:43:41 -0700 Engine • revision 235db911ba Tools • Dart 3.4.4 • DevTools 2.34.3 $ |
次に、doctorで環境の診断
|
1 |
$ flutter doctor |
診断結果が表示されます
![[Flutter] Mac でのAndroid & iOS 開発環境設定 1x1.trans - [Flutter] Mac でのAndroid & iOS 開発環境設定](https://akira-watson.com/wp-content/themes/simplicity2/images/1x1.trans.gif)
問題ないようです
テストプロジェクト
これで環境設定がある程度できました
次は実際のアプリを作っていきましょう
コマンドプロンプトで以下のコードを実行します
flutter create [プロジェクト名]
例えば testapp001 で作成してみます
|
1 2 3 4 5 6 7 8 9 10 11 12 13 14 15 16 17 18 |
$ flutter create testapp001 Creating project testapp001... Resolving dependencies in `testapp001`... (1.2s) Downloading packages... Got dependencies in `testapp001`. Wrote 129 files. All done! You can find general documentation for Flutter at: https://docs.flutter.dev/ Detailed API documentation is available at: https://api.flutter.dev/ If you prefer video documentation, consider: https://www.youtube.com/c/flutterdev In order to run your application, type: $ cd testapp001 $ flutter run Your application code is in testapp001\lib\main.dart. |
この場合、
\Users\[ユーザー名]\
以下に testapp001 フォルダが展開されています
プロジェクトの中に入り
cd testapp001
flutter run
でアプリを起動します
|
1 2 3 4 5 6 7 8 9 10 11 12 13 14 15 16 17 |
$ cd testapp001 $ flutter run Connected devices: macOS (desktop) • macos • darwin-arm64 • macOS 14.5 23F79 darwin-arm64 Mac Designed for iPad (desktop) • mac-designed-for-ipad • darwin • macOS 14.5 23F79 darwin-arm64 Chrome (web) • chrome • web-javascript • Google Chrome 127.0.6533.89 No wireless devices were found. [1]: macOS (macos) [2]: Mac Designed for iPad (mac-designed-for-ipad) [3]: Chrome (chrome) Please choose one (or "q" to quit): |
とりあえず。Chromeを選択すると
Chromeが立ち上がり
アプリが起動します
「+」ボタンをクリックすると数字が増加します
Flutter環境構築はできているようです
References:
Flutter
Flutter architectural overview
Flutter Install
Set up an editor – Flutter
![[Flutter] Mac でのAndroid & iOS 開発環境設定 ccf1639bf2a87341a46fd52c9da41b46 s 100x100 - [Flutter] Mac でのAndroid & iOS 開発環境設定](https://akira-watson.com/wp-content/uploads/2015/12/ccf1639bf2a87341a46fd52c9da41b46_s-100x100.jpg)
![[Flutter] Mac でのAndroid & iOS 開発環境設定 avd a00 100x100 - [Flutter] Mac でのAndroid & iOS 開発環境設定](https://akira-watson.com/wp-content/uploads/2015/12/avd_a00-100x100.jpg)
